Tuesday, June 2, 2015

Hamburger Stroganoff

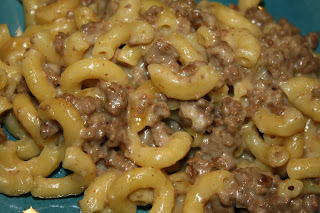
Hamburger Helper is always a quick easy meal in our home. I thought tonight I would try to cook a homemade version. I thought that cheesier flavor made a big difference in the taste!
 
This recipe takes the same amount of time as buying the box version, but you can make it healthier and more flavorful.  You can replace the noodles and flour with wheat versions.
 

Hamburger Stroganoff
Prep Time: 5 minutes
Cook Time: 25 minutes
Total Time: 30 minutes
Serving Size: 4-5 servings

Ingredients:

1 pound ground beef
1 1/2 cups uncooked noodles*
2 cups milk
1/2 cup water
2 tablespoons flour*
1/4 teaspoon onion powder
1/4 teaspoon sea salt
1/4 teaspoon garlic powder
1/4 teaspoon paprika
3/4 cup white sharp cheddar cheese

Instructions:

1. In a large skillet brown beef and drain.
2. Remove skillet from burner and add pasta, milk, water, spices, flour and cheese.
3. Return to burner over medium-high heat. Bring to a boil.
4. Reduce heat to a light simmer and cook for 10-15 minutes. Make sure to stir frequently.
5. Enjoy!

*You may replace the noodles and flour with wheat versions to make the meal healthier.
 

S'mores Bark

My girls and I made this recipe awhile ago. We were craving s'mores, but during the summer in Arizona it is too hot to have a fire. Instead we made one huge s'more for everyone to enjoy for a few days.

This recipe is fun for all ages. You can even bring more fun to the bark by adding white chocolate or peanut butter.


S'mores Bark
Prep Time: 10 minutes
Set Time: 1 hour
Total Time: 1 hour 10 minutes

Ingredients:

24 oz dark chocolate chips
1 cup graham crackers
3/4 cup mini marshmallows
2 Hersey's milk chocolate bars

Instructions:

1. Cover a 15 x 10 cookie sheet with parchment paper.
2. Melt the dark chocolate chips per the package directions. Stir periodically while melting.
3. Spread the melted chocolate chips on to the parchment paper.
4. Break apart graham crackers and milk chocolate bars.
5. Sprinkle graham crackers, marshmallows and chocolate pieces  over top.
6. Lightly press pieces into the chocolcate.
7. Refrigerate for 1 hour to allow the bark to cool and set.
8. Break into pieces and enjoy!

Friday, May 29, 2015

Teriyaki Chicken

I have always had an issue doing one thing at a time. I like to keep my plate full and our bellies! Tonight we whipped up some Teriyaki Chicken with homemade teriyaki sauce. Sorry I could not get a decent picture of the chicken.


Teriyaki Chicken
Prep Time: 10 minutes
Cook Time: 20 minutes
Total Time: 30 minutes
Serving Size: 4-6 people

Ingredients:

4 pounds chicken breast
1 cup water
5 tablespoons brown sugar
1/4 cup soy sauce
1 tablespoon honey
1/2 teaspoon granulated garlic
1/2 teaspoon ground ginger
1 1/2 tablespoons cornstarch
1/4 cup cold water

Instructions:

1. Preheat oven to 450 degrees. Cut chicken breasts into thin strips and place on baking sheet. I sprinkled a little bit of garlic salt on each piece.
2. Bake in oven for 20 minutes or until chicken is fully cooked.
3. In a medium saucepan combine the 1 cup water, brown sugar, soy sauce, honey, garlic, and ginger and cook over medium heat.
4. Combine the cornstarch and 1/4 cup cold water in a small bowl until it dissolves.
5. Add mixture to the saucepan and heat until it thickens.
6. Pour teriyaki sauce over cooked chicken and serve.

We had rice and broccoli with our teriyaki chicken.

Thursday, May 28, 2015

Peanut Butter Apple Snacks

I decided to whip up a quick fun snack for them. My kids go wild for red apples and we go through more peanut butter then I could have imagined in a week. I decided to make the snack all their favorite treats...apples with peanut butter spread a crossed and sprinkled with a couple of chocolate chips (I really need to replenish my stock of dark chocolate chips, but the regular ones worked just fine).

Needless to say they were gone before I put the plate down.

BBQ Sauce

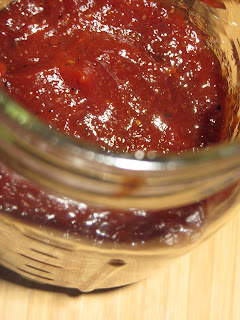
Tonight I made a homemade BBQ Sauce that would be good for chicken, shrimp, pork, or anything else you would like to put it on.

 
BBQ Sauce
Prep Time: 10 minutes
Cook Time: 1 hour
Total Time: 1 hour and 10 minutes

Ingredients:

2 cups ketchup
1 cup water
1/2 cup apple cider vinegar
1 tablespoon Worcestershire sauce
1 tablespoon lemon juice
1/2 tablespoon Tapatio Sauce for regular or 1 tablespoon for spicy
1/2 tablespoon ground black pepper
1/2 tablespoon onion powder
1/2 tablespoon garlic salt
1/2 tablespoon mustard
5 tablespoons brown sugar
5 tablespoons sugar

Instructions:

1. In a large saucepan mix ketchup, water, vinegar, Worcestershire sauce, Tapatio, and lemon juice.
2. Bring to a boil.
3. Add the remaining ingredients.
4. Turn to low and simmer uncovered for 1 hour.

BBQ Shrimp

We made a big feast tonight for dinner before our neighbors had to leave for basketball practice. Our table was filled with macaroni and cheese, cheese broccoli, corn on the cob, garlic knots, BBQ shrimp, and brownies for dessert. Out of a pound of shrimp we only had 6 pieces remaining. We laughed that we should have just finished them, but at least I have a little treat tomorrow for lunch.

I used the same BBQ recipe as the previous post. I decided to post it by itself and with the Shrimp in case you were just looking for the sauce alone or with shrimp.

 
BBQ Shrimp Prep Time: 10 minutes
Cook Time: 1 hour for the sauce and 10-12 minutes for the shrimp
Total Time: 1 hour and 10 minutes
Serving Size: 3 people

Ingredients:

1 pound shrimp
2 cups ketchup
1 cup water
1/2 cup apple cider vinegar
1 tablespoon Worcestershire sauce
1 tablespoon lemon juice
1/2 tablespoon Tapatio Sauce for regular or 1 tablespoon for spicy
1/2 tablespoon ground black pepper
1/2 tablespoon onion powder
1/2 tablespoon garlic salt
1/2 tablespoon mustard
5 tablespoons brown sugar
5 tablespoons sugar

Instructions:

1. In a large saucepan mix ketchup, water, vinegar, Worcestershire sauce, Tapatio, and lemon juice.
2. Bring to a boil.
3. Add the remaining ingredients.
4. Turn to low and simmer uncovered for 1 hour.
5. Preheat oven to 425 degrees
6. Remove tails from shrimp and place shrimp on a baking sheet.
7. Place shrimp in oven to cook for 10-12 minutes or until they are fully cooked and pink.
8. Mix cooked shrimp and BBQ sauce in a medium size bowl.
9. Enjoy!

BBQ Sauce Recipe

Wednesday, May 13, 2015

Cheese Ravioli

Last night we whipped up some homemade ravioli (my oldest daughters favorite food). They are quick and easy to whip up.

I used the homemade marinara sauce to top it off. If you are looking to cook a little quicker you can use your favorite store bought sauce.

Cheese Ravioli Prep Time: 10 minutes
Cook Time: 45 minutes
Total Time: 55 minutes

Ingredients:

26-27 jumbo pasta shells
1 large egg
30 ounces ricotta cheese
2 pinches of salt
1 cup shredded mozzarella cheese
1/4 cup chopped green onions

Instructions:

1. Cook shells according to packaging instructions to al dente. Once cooked drain and let cool.
2. Preheat oven to 360 degrees.
3. In a medium bowl beat medium egg.
4. Add ricotta cheese and salt to bowl. Mix well.
5. Combine shredded mozzarella cheese and chopped green onions to the bowl. Stir all ingredients until fully mixed.
6. In a 9 x 13 dish spread 1/3 of the mozzarella sauce over the bottom of the baking dish.
7. In the cooled shells fill the centers with the ricotta mixture.
8. Arrange the layers in a single layer on top of the marinara sauce.
9. Pour the remaining sauce over the shells.
10. Cover the baking dish with aluminum foil and bake for 35 minutes.
11. Remove the foil and cook for an additional 10 minutes. Check the ravioli at 5 minutes to make sure the shells do not overcook.
12. Enjoy!

Marinara Recipe

Marinara Sauce

My 3 year old son helped me whip up some marinara sauce tonight. He is doing very well with telling me when I have reached the correct measurement and loves to pour the ingredients into whatever we are making that day.


Marinara Sauce
Prep Time: 10 minutes
Cook Time: 30 minutes
Total Time: 40 minutes

Ingredients:

1/2 cup olive oil
1/2 of a medium white onion
2 tablespoons granulated garlic
1/4 cup basil
2 tablespoons parsley
2 teaspoons oregano
2 - 28 oz can diced tomatoes
1 teaspoon salt
1/2 teaspoon ground pepper
1 tablespoon balsamic vinegar

Instructions:

1. In a large saucepan heat the olive oil over medium heat.
2. Chop the onion into small pieces.
3. Add the chopped onion to the saucepan and sauté for 5 minutes (they should be translucent and soft).
4. Add garlic and continuously stir for one minute.
5. Add basil, parsley, and oregano and stir continuously for one minute.
6. Pour in the two cans of diced tomatoes, salt and pepper. Stir all the ingredients together until nicely mixed.
7. Mash the diced tomatoes thoroughly and bring the sauce to a boil.
8. When the sauce begins to boil reduce heat to low and simmer for 20 minutes.
9. Add the balsamic vinegar and stir.
10. Enjoy the sauce!

Tuesday, May 12, 2015

Happy Tuesday

They both make me very proud because they love school and put there all into it. I am one lucky mom!

Their lunches had ham macaroni salad, fruit salad (cantaloupe, grapes, strawberries), cottage cheese, organic apple sauce, and carrots or celery. They took trail mix for their afternoon snack.

Ham Macaroni Salad Recipe

Chocolate Lave Cake

My son and I secretly made lava cake today while the girls were doing their homework. They did not even know that it was in the crock pot until I served them. I love when we can have fun little surprises that bring a smile to everyone (and their bellies).

This dessert is prefect with vanilla ice cream and hot fudge!

 
Chocolate Lava Brownie
Prep Time: 10 minutes
Cook Time: 2 hours 30 minutes - 3 hours 30 minutes
Total Time: 2 hours and 40 minutes - 3 hours 40 minutes

Ingredients:

1 box chocolate cake mix (I used Betty Crocker super moist dark chocolate cake mix)
1 1/4 cups milk
1/2 cup vegetable oil
3 eggs
1 Jell-O instant sugar-free chocolate pudding (3.9 oz)
2 cups milk
1 bag of dark chocolate chips

Instructions:

1. Line 3 - 4 quart crock pot with parchment paper.
2. In a medium bowl mix together cake mix, 1 1/4 cups milk, vegetable oil and eggs for 3 minutes or until well mixed.
3. Pour cake mix into lined crock pot.
4. In a medium bowl mix instant pudding and 2 cups of milk for 4 minutes.
5. Pour pudding on top of cake mix. Do not stir!!
6. Sprinkle the bag of dark chocolate chips on top of the pudding. Do not stir!!
7. Cover the crock pot and cook for 2 hours and 30 minutes. *Some crock pots cook a little slower so it may take up to 3 hours and 30 minutes.*
8. Enjoy! Top it off with your favorite ice cream and toppings!

Brownie Cookies

I believe that I have mentioned that we love brownies in this house. Tonight the thought of brownies sounded delicious, but I wanted a different twist on it. I whipped up some brownie cookies and now the house smells amazing!

My girlfriend wasn't home to be my taste tester, so I dropped a plate off to her husband. I hope there is still one left for her in the morning...he was letting all the neighborhood kids try them.


Brownie Cookies
Prep Time: 10 minutes
Bake Time: 45 minutes
Total Time: 55 minutes

Ingredients:

1 1/4 cup Nestle cocoa powder
1 1/2 cup all purpose flour
1 teaspoon baking powder
1 teaspoon baking soda
1 cup softened unsalted butter
1 cup white sugar
3/4 cup packed dark brown sugar
2 eggs
2 teaspoons vanilla
1 package chocolate chips

Instructions:

1. Preheat oven to 350 degrees.
2. In a medium bowl stir together Nestle cocoa powder, flour, baking powder and baking soda. Then set aside.
3. In a large bowl beat butter, white sugar, and brown sugar until creamy.
4. Add eggs and vanilla, then blend well.
5. Pour half of the cocoa / flour mixture in at a time. Ensure that it is fully mixed.
6. Stir in the bag of chocolate chips.
7. On a baking sheet place rounded one inch balls of dough.
8. Bake for 10-12 minutes or until a toothpick comes out clean.
9. Cool on a baking raking.
10. Enjoy with a glass of cold milk!

Wednesday, May 6, 2015

Health School Lunches

I use to have a pantry full of prepackaged food that was quick and easy for me to whip up a lunch. I thought I was helping my family out because I could be done in a jiffy or they could easily get something when they were hungry. It took a long time for me to realize that I was just throwing away my money, my kids were coming home hungry from school, and I wasn't showing them the benefit of proper eating.

It has now been 2 years since I cleared out our pantry and started fresh. I am not saying there is no junk food in our home...we just made major changes. The shelf that use to have 10 different styles of Doritos chips now has barkTHINS, Snapeas Crisps, and one bag of tortilla chips. Our baskets that use to hold granola bars and gummies now have pretzels, a variety of nuts, and edamames. We use to have an abundance of cereals because I could get them for $0.50-$1, but now we have dwindled them down to a few. Yes, we still have fun kids cereals, but we also have a variety of flavors of Cheerios (Chocolate, Peanut Butter, etc). My baking shelves have gone from prepackaged goodies to ingredients for us to make them from scratch.

We didn't just revamp our pantry we also cleared out the fridge to make room for fruits and vegetables the children like (and the adults). I am slowly trying different fruits and vegetables with them in hopes to find a larger variety they will eat. We branched off to Almond Milk for the 2 younger kids. My daughter I think enjoys it because it is already premade chocolate milk and my son is lactose intolerant. We also purchase one container of carb free milk every 2 weeks for him to be able to enjoy cereal. Our cheese drawer seems to keep multiplying with new flavors (we always have cheddar for the little man).

It may not sound like much, but these small steps have really changed our lives. My kids are healthier, the girls come home from school with full bellies that last until dinner time, they all have more energy (ok sometimes this is a negative for us moms), and the girls have told me countless stories about kids trying to trade them junk food for their healthy food. Who would have thought that children actually enjoy eating properly?

I am so proud of them for joining me in becoming healthier. I know the first week of no chips and gummies was a little traumatizing, but they have not complained since then.

As a family we will continue on our journey to live healthy lives! Yes, we splurge with homemade treats, but they no longer control our lives or our bank account.

Today in our Anna & Elsa and Pink Plaid lunch boxes the girls took peanut butter and honey sandwiches with carrots and celery, apples and grapes, applesauce, Babybel cheese, and a Halo orange. For a snack they took 5 yogurt covered cranberries with cinnamon roasted almonds.

Tuesday, May 5, 2015

Brown Sugar Balsamic Glazed Chicken - Crockpot Recipe

Well, once again my 3 year old son climbed on top of the island and helped me whip up a delicious meal for our family. He loves to pour all the ingredients in and stir. I can not complain he is an amazing helper.

I have to say this recipe came out mouth watering! I can not wait to eat the left overs tomorrow for lunch!


Brown Sugar Balsamic Glazed Chicken - Crockpot Recipe
Prep Time: 10 minutes
Cook Time: 4 - 6 hours depending on your crock pot
Serving Size: 4 - 6 people

Ingredients:

2 pounds chicken breast
1 teaspoon ground sage
1/2 teaspoon sea salt
1/4 teaspoon ground pepper
1 teaspoon granulated garlic
1/2 cup water
1/2 cup brown sugar
1 tablespoon cornstarch
1/4 cup balsamic vinegar
1/2 cup water
2 tablespoon soy sauce

Instructions:

1. Mix together sage, salt, pepper, and granulated garlic.
2. Pour 1/2 cup water in slow cooker. Place chicken breast in slow cooker and sprinkle the seasonings over the top of the chicken breasts.
3. Cook 3 - 5 hours on low.
4. At the 3rd - 5th hour (depending on your slow cooker) in a small sauce pan mix together the brown sugar, cornstarch, balsamic vinegar, water and soy sauce over medium heat for 4 minutes or until the mixture thickens.
5. Pour the brown sugar glaze all over the chicken breasts and cook for an additional hour.
6. Shred into pieces and enjoy!

Monday, April 27, 2015

Frozen Themed Blue Margarita

The kids had a blue themed drink for the party, so why not the adults too? Of course it had to be something blue and yummy to drink!

I took the name from another drink that I found. Thinking of unique Frozen themed drink names is not my specialty.

The name tag is printed from: Oh My Fiesta. I copied the picture I was interested in and placed it in Microsoft Word. Then I made a text box to add the wording.


Blue Margarita Prep Time: 5 minutes
Serving Size: 12 drinks

Ingredients:

600 ml lime juice
900 ml silver tequila
475 ml blue curacao liqueur
250 ml agave nectar (or to taste)
coarse salt for the rim of the glass is optional

Instructions:

1. Chill lime juice and tequila.
2. Mix together all ingredients except for the salt.
3. Optional - salt the rim of the glass
4. Serve over ice!


Chocolate Cupcakes with Butter Frosting - Frozen Themed Snowflake

This recipe can be used for any cupcakes. I just turned my icing blue and set them up in the shape of a snowflake for my daughters Frozen themed party.


Chocolate Cupcakes with Butter Frosting Prep Time: 15 minutes
Bake Time: 15 minutes per batch
Total Time: 1 hour (I had 3 batches)
Serving Size: 30 cupcakes

Ingredients for Cupcakes:

1 cup unsweetened cocoa powder
1 1/2 cups all-purpose flour
1 teaspoon baking soda
1 1/2 teaspoons baking powder
1/2 teaspoon salt
4 eggs
1 cup granulated sugar
1 cup packed brown sugar
2/3 cup vegetable oil
4 teaspoons pure vanilla extract
1 cup buttermilk

Ingredients for Icing: This is a double batch of the frosting below to ensure enough for all the cupcakes. I frosted mine a little light.

2/3  cup butter
9 cups confectioner's sugar
1/2 cup of milk
3 teaspoons pure vanilla extract

Instructions for Cupcakes:

1. Preheat oven to 350 degrees. Line muffin pan with cupcake liners.
2. In a medium bowl stir together cocoa, flour, baking soda, baking powder, and salt. Then set aside.
3. In a large bowl mix egg, sugar, brown sugar, oil and vanilla until it is smooth.
4. Pour 1/2 of the dry ingredients and 1/2 of the buttermilk into the wet ingredients. Blend together.
5. Repeat with remaining dry ingredients and buttermilk. Mix until everything is fully blended together.
6. Pour or spoon the batter into the liners. Fill the liners halfway to avoid spilling.
7. Bake for 15 minutes or until a toothpick inserted into the center comes out clean.
8. Let cupcakes fully cool before icing.

Instructions for Icing:

1. In a bowl beat butter until it is fluffy.
2. Gradually add 4 1/2 cups of sugar and beat well.
3. Slowly beat in milk and the vanilla.
4. Add in remaining sugar and beat slowly until the spreading is consistent.
5. Put a few drops of food coloring in if you would like to add color.
6. Spread onto cooled cupcakes.
Frozen Birthday Party

I do not think the Frozen fad will be dying out anytime soon now that they have announced Frozen 2! My daughter has been waiting all year to have a Frozen themed birthday party...so I went to Pinterest and tried to create the party she had imagined.

We are not big on goodie bags. I try to keep them somewhat simple. Each goodie bag cost me $3.00. I decided since it was a sleepover and there would be less children that I would invest in cups they could use at the party as well as take home with them (I had a hard time finding the cups at Target and Walmart. Kohl's ended up have a whole stack in the card section). I then placed a glow stick (for them to play with the night of the sleepover), Frozen pencil (found at Party City), Frozen Ring (Party City again) and I bought blue nail polish with glitter inside to fill the cups with.


My kids have never been big into games at a party, so I planned only one....a SNOWBALL FIGHT! Ok, to a lot of people that is not a big thing, but here in Arizona we do not get much snow. We had to actually make our snowballs out of white yarn. We made 43 (don't know why that exact number) pom poms and had 8 kids that played. I placed the bowl in the center of the grass and told them when they could start. The kids played for a good 15 minutes.


I printed off a few mazes and different coloring pages in case the kids wanted a quick break from playing. I found the pages on: Mighty Ink Jet Frozen Coloring Pages


We had a wide arrangement of food that was all themed with the party (well all of it expect for the 2 pizzas we had). I made Frozen name cards from: Oh My Fiesta Free Frozen Printable Cards. I copied the pictured into Microsoft word and made a text box with the wording. I saw where people were taking Styrofoam balls and cutting them in half to hold up the name cards. I was trying to save a couple of dollars so I just left enough paper so that I could fold it in half.
 
Everything was delicious!
 
 
Sven's carrots was just little cups of ranch with baby carrots in them.


Anna's snowballs were rice krispy treats rolled into balls and topped with sprinkles.


Hans' frozen hearts were strawberries dipped in white chocolate.


Kristoff's meatballs.
 
 
We had mini chocolate chips, stick pretzels, candy corn, marshmallows, and vanilla frosting to be able to build a snowman with.


Anna and Elsa's chocolate was chocolate chips melted with a little bit of vegetable oil.
 
 
Elsa's Ice Crystals I found on Amazon: Cotton Candy Rock Crystals. I think the adults loved these more than the kids.
 
 
For kid drink I had 2 regular non caffeinated sodas and then I put in a drink dispenser two 7-up 2 liters with a few drops of blue food dye.


The adult drink was a Frozen Themed Margarita.

 
Finally the cake....I do not know how to create an amazing Frozen cake off hand, so instead I created a cupcake snowflake. My frosting skills are starting to improve a little.


Peanut Butter Rice Krispy Treats

Rice crispy treats are a fun simple treat to enjoy at any time. I wanted to make the treat for my sons birthday, but with a little twist. Originally I was going to make meteorites, but I didn't get a chance to roll them into balls.


Peanut Butter Rice Cripsy Treats

Prep Time: 35 minutes
Cook Time: 5 minutes
Total Time: 40 minutes

Ingredients:

3 cups rice crispy cereal
1/2 cup creamy peanut butter
1/2 cup maple syrup
1 teaspoon vanilla extract

Instructions:

1. Place the cereal in a large bowl and put to the side.
2. In a small saucepan melt peanut butter, maple syrup and vanilla until smooth.
3. Pour mixture over cereal and mix together until everything is fully coated.
5. Grease a 13 x 9 baking dish and pour peanut butter rice crispy treats into dish and firmly press down until flat.
6. Put the dish in the freezer for 30 minutes.
7. Cut and serve!

Sunday, April 26, 2015

Homemade Waffles

We have waffles with real maple syrup almost every Sunday for breakfast. I love the smell of them in the house, but hate the cost of buying the box mix.

This morning the kids and I took a little adventure in making some buttery waffles to fill our hungry bellies.


Homemade Waffles
 
Prep Time: 5 minutes
Cook Time: 2 minutes each waffle
Serving Size: 1 1/2 cup of mix makes 6 waffles
 
Ingredients for Mix:
 
9 cups all purpose flour
7 tablespoons baking powder
2 tablespoons salt
1/2 cup sugar
 
Ingredients for Waffles:
 
1 1/2 cup mix
1 1/4 cup milk
1 large egg
2 1/2 tablespoons melted butter
1 teaspoon pure vanilla
 
Instructions:
 
1. Add all ingredients for waffle mix into a freezer bag. Zip and shake until all ingredients are mixed well. Mix is now ready.
2. In a medium bowl mix milk, egg, melted butter and pure vanilla.
3. Add in waffle mix and blend all ingredients together.
4. Pour over a hot waffle griddle.
5. Enjoy with syrup.

Saturday, April 25, 2015

Chicken Fajitas

My oldest daughter has never been much of a meat eater until recently. Ever since I started this challenge of cooking homemade meals instead of just using pre-portioned seasoning packs I have seen her devour meat. Who would have known it would have just been the simplest change to get her to eat it.

Tonight we whipped up some fajitas with refried beans for dinner. For once she ate her chicken before she started her sides. I don't think I have seen her do that before. This mom is proud of how well she is doing with trying new things.


Chicken Fajitas
Prep Time: 10 minutes
Cook Time: 12 minutes
Total Time: 22 minutes
Serving Size: 4 people

Ingredients:

2 pounds defrosted chicken
Fajita Seasoning
1/3 cup vegetable oil
1 red pepper
1 green pepper
1 small onion

Instructions:

1. Cut chicken, peppers, and onion into thin slices.
2. In a medium size bowl mix chicken, seasoning, peppers, and onions.
3. Cover bowl and place in the refrigerator for a couple of hour to marinate.
4. When you are ready to cook pour vegetable oil in a large skillet on medium-high heat. Swirl around to coat the bottom of the pan.
5. Add chicken mixture to the pan. Stir and flip the mixture until the chicken is fully cooked. Chicken will cook in 9-12 minutes.
6. Place chicken mixture in a tortilla and enjoy.

Fajita Seasoning

One of my favorite Mexican foods to eat is fajitas, but I have never been big fan of store bought fajita seasoning packs. In the past I have made a couple different mixtures. Tonight we decided to try a new one.

Fajita Seasoning
Prep Time: 5 minutes

Ingredients:

2 1/2 tablespoons chili powder
1 tablespoon paprika
2 teaspoon sugar
1 teaspoon sea salt
1 teaspoon cayenne pepper
1 teaspoon cumin
2 teaspoon onion powder
1 teaspoon garlic powder

Instructions:

1. Mix all ingredients together.
2. Put in an air tight container until time of use.
3. Use 2 tablespoons of seasoning for 2 pounds of chicken.

Friday, April 24, 2015

Ending the Week Right

The weekend has finally arrived! Time to get ready for another weekend packed with additional children coming in and out of our door! It is only 4:30 pm on Friday and I have had two additional young ladies playing school at my house with my girls. Their laughter brings a smile to my face!

We couldn't start the weekend off right without a healthy lunch to fill their bellies in school today. The girls took a brown sugar ham sandwich with an orange, cottage cheese, carrots & celery, and a fruit salad. Snacks for the day are raspberry yogurt pretzels with honey sesame sticks.


The girls have informed me that they are not too fond of the honey sesame sticks, so I am back to the drawing board on new ideas to keep them wanting more. I guess I will check to see what Fry's has tonight when we go pick up Into the Woods. 

Thursday, April 23, 2015

Hamburger Seasoning

This has been a long busy weekend, so I thought going back to the basics would be great for dinner! I have had the hamburgers chilling in the fridge for a few hours with the seasoning sprinkled all over the top. Can not wait to sit down with a scrumptious burger while enjoying our Sunday night show as a family!

Hamburger Seasoning
 
Prep Time: 5 minutes
Serving Size: 6-8 burgers depending on how seasoned you like your burgers
 
Ingredients:


1/2 teaspoon granulated garlic
1/2 teaspoon onion powder
1/4 teaspoon cayenne pepper
2 teaspoons paprika
a pinch of black pepper
1/8 teaspoon sea salt
1/2 teaspoon brown sugar

Instruction:

1. Mix all the seasoning together in a small bowl.
2. Sprinkle on top of each burger.

* I  always top off my burgers with some Worstershire sauce before placing them in the fridge to soak in the ingredients.

* If you would like a little more kick put in 1/2 a teaspoon of cayenne pepper.

Peanut Butter Bananas with Dark Chocolate

I whipped up some snacks for my son to have tomorrow. He will be surprised to see all his favorites in one yummy snack!

Sorry we live in Arizona, so the chocolate does not stay frozen very long (Yes it is March and our AC is already on because of the heat).

Peanut Butter Bananas with Dark Chocolate
Prep Time: 10 minutes

Ingredients:

Banana
Peanut Butter
Dark chocolate chips

Instructions:

I only used one banana because it was a quick snack. You can make as many of the little bites as you would like.

1. Melt dark chocolate.
2. Slice banana into round pieces.
3. Spread peanut butter on the top of one banana slice and then cover peanut butter with another banana slice.
4. Dip into melted dark chocolate until one side or the whole thing is coated (your choice).
5. Place on lined cookie sheet.
6. Freeze for 1 hour before eating.
7. Enjoy!

Wednesday, April 22, 2015

Peanut Butter, Banana, Honey, and Cinnamon Sandwich

Have you been trying to find a sandwich that your kids will beg you for a second one? Well I think I found that one today! My middle daughter actually had seconds and both girls have requested it for their lunches tomorrow. I love when they devour what I make them!


Peanut Butter, Banana, Honey, and Cinnamon Sandwich
Prep Time: 5 minutes
Cook Time: 5 minutes
Total Time: 10 minutes

Ingredients:

Bread
Banana
Peanut Butter
Honey
Cinnamon
Butter

Instructions:

1. Butter one side of two pieces of bread.
2. Place the buttered side down on a large skillet or a griddle.
3. Before warming up add the peanut butter to both sides, sliced bananas to one side with honey swirled on top, and cinnamon on the other side.
4. Turn stove onto low-medium heat and toast to your liking.
5. Enjoy!

Enjoying the Sun

The sun is shining! It is almost 90 degrees outside, but the kids begged to come out to ride their bikes, scooters and roller blades (each kids is into a different one). We are loaded up on ice cold water and a revamped version of the peanut butter apples.

Today I melted the peanut butter and drizzled it all over the apple slices before sprinkling mini chocolate chips on top. The girls are hovered by the basketball hoop eating up every last drop.